


Allows sellers to add your geographic location to display a map on your seller profile. Shows a map with all the sellers located on the main page.

Downloaded more than 50 times
favorite_border Add to my wishlist in the first yearWHAT DOES THIS MODULE GIVE?
Easy installation.
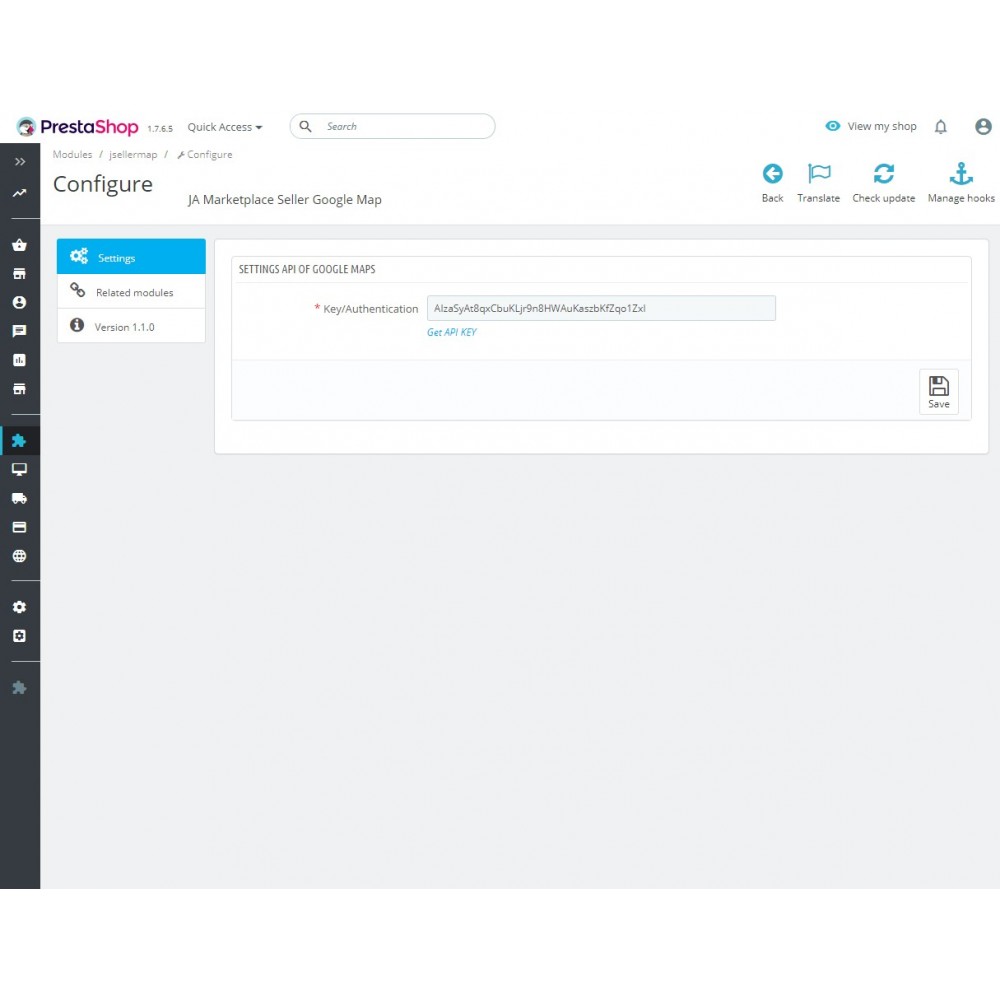
Google Maps API.
Location of marketplace vendors on the map.
Map in the seller's profile with its location.
Map on the home page with all vendors located.
FEATURES
This module allows sellers to add their geographic location to display a map on their profile and appear on the map of home page.
When a customer creates a seller account or edits their seller account, 2 new fields appear on the form that allow adding the coordinates of a point on the earth map.
The seller can fill in the latitude and longitude of their geographical location to appear on the maps that this module adds to the marketplace.
Latitude and longitude are 2 parameters that represent the geographic coordinates on the Earth map.
If you don't know how to get these coordinates you can check the following link:
https://support.google.com/maps/answer/18539?hl=en
However, this is not all, on the map on the main page, customers will be able to see at a glance where all the sellers of the market are located.
When you mouse over the locations, the seller's name and / or shop appears.
Clicking on a location opens an informational balloon where you can see much of the seller's information.
What information appears on the balloon?
All this information will only appear in the balloon if they are enabled in the JA Marketplace module configuration.
First of all, click “Add new module” at modules tab on back office. You will find it in the top right. After that, select packaged file you have downloaded and click “Upload file”. Now your module appears on modules list. Click on “Install”, and “Configure” next.
You can also unload .zip file and upload it into your modules directory. In this way you will install and configure module from modules admin.
It is very important that you thoroughly review all the documentation of the products we sell, try the demonstration and ask us any questions you have before making the purchase because product returns are not allowed, since it is non-encrypted software and it is not a tangible product.
Once sold a licences, the amount will not be returned under any circumstances except for causes attributable to this entity, in that case the origin of the problem will be studied to try to solve it by dedicating the maximum capacity to it.
In case the product is not working in your store, we will need the access data to the site (FTP and backoffice mainly) to review and solve the problems.
Only in the event that the problem could not be solved would the refund be issued.
Refund requests will not be considered if the purchase was made more than 3 months ago.
The purchase of this module includes 12 months of technical support and updates and is tacitly renewed at the end of the period.
You can cancel your subscription at any time before the end of the current period.
Download security updates.
Download compatibility updates.
Download evolutions and new functionalities.
Unlimited assistance.
Installation.
The adaptations with the different types of template.
The specific modifications or customizations that you need to make in your shop.
Solve problems related to the template, incompatibilities with third-party modules or third-party service problems such as hosting limitations among others.
Take a look at the hour bag service we offer.
View hour bag
Offers your customers the possibility of contact on the product page.

Allows your customers to communicate with you and market sellers using WhatsApp.

Enable on the product page a block of similar products from other sellers in the market to compare prices.

Adds a slide image control or banner on the category page of your shop to promote products, subcategories or whatever you can imagine.
Allows sellers to register as manufacturers or brands to get all the benefits of being a manufacturer in the market.
Allows sellers to register as shop contacts to appear positioned on the page or stores map of the marketplace.

Establish a different commission percentage for each category in your market.

Puts an expiration date on the products of the market. For example, products expire and are automatically deactivated after 60 days.

Establish the commission percentage in your market according to the price range of the product. Complementary module for JA Marketplace.

Allows the customer to select a shipping option for each package and / or seller involved in the shopping cart in your marketplace.

Allows the marketplace's sellers to add links to all your social networks in your profile of seller or page of your store.

Allows the market sellers to add offers to their products. Sellers can select the product, type of reduction, reduction and whether the...
Allows sellers to add your geographic location to display a map on your seller profile. Shows a map with all the sellers located on the main page.


